Introduction
Rsyncis an open-source application that provides fast incremental or mirror backup by leveraging built-in data deduplication algorithms. It is included in almost all Linux distributions.
Features
- Can update whole directory trees and filesystems
- Optionally preserves symbolic links, hard links, file ownership, permissions, devices and times
- Requires no special privileges to install
- Internal pipelining reduces latency for multiple files
- Can use rsh, ssh or direct sockets as the transport
- Supports anonymous rsync which is ideal for mirroring
Basic Use
rsync -option source/ destination/
| Option | Description |
|---|---|
| -v | Verbose mode, outputs detailed information |
| -r | Recurse into directories |
| -a | Archive mode (-rlptgoD, no -A, -X, -U, -N, -H) |
| -h | Output numbers in a human-readable format |
| -z | Use compression to transfer data |
| -e | Specify the remote shell to use |
| -P | Same as –partial –progress |
| -W | Copy files whole (without delta-xfer algorithm) |
| –progress | Show progress during transfer |
| –delete | Delete extraneous files from destination directories |
| –remove-source-files | Sender removes synchronized files (non-dir) |
| –exclude=PATTERN | Exclude files matching PATTERN |
| –include=PATTERN | Don’t exclude files matching PATTERN |
| –copy-as=USER[:GROUP] | Specify user and optional group for the copy |
| –chmod=CHMOD | Affect file and/or directory permissions |
Samples
rsync -avh /home/user/data/ /mnt/backup
Copy /home/user/data/ (as source directory) to /mnt/backup (as destination directory), using the options -avh.
Rsync Server Setup
Rsync can be used not only for local backups, but also to transfer data between different OSes (e.g. Windows, macOS, Linux, etc.). It can push data to a remote host (for backup) or pull from a remote host (for restore). However, an rsync daemon needs to be set up on one side.
1. Set up Rsync Daemon on OpenWRT (Typical)
Install Rsync Daemon:
opkg update && opkg install rsyncd
Two files are required:
| File | Description |
|---|---|
| /etc/rsyncd.conf | Rsyncd config file |
| /etc/rsyncd.secrets | Rsyncd authentication password file |
For the rsyncd config file:
cat >> /etc/rsyncd.conf << EOF
# /etc/rsyncd.conf
# Minimal configuration for rsync daemon

# Next line required for init script
pid file = /var/run/rsyncd.pid
log file = /var/log/rsyncd.log
use chroot = no
uid = nobody
gid = nogroup
read only = no

[Tools]
        path = /mnt/Tools
        comment = Shared Tools Folder over Rsync
        read only = no
        auth users = user01
        secrets file = /etc/rsyncd.secrets


[Media]
        path = /mnt/Media
        comment = Shared Media Folder over Rsync
        read only = no
        auth users = user02
        secrets file = /etc/rsyncd.secrets
EOF
Two directory folders named Tools and Media are set up for sharing, and the users user01 and user02 are specified for each share.
For the rsyncd authentication password:
cat >> /etc/rsyncd.secrets << EOF
user01:P@ssw0rd01
user02:P@ssw0rd02
EOF
This defines two users and their passwords.
(OPTIONAL) Generating a Random Password with ‘OpenSSL’
To generate a pseudo-random password, we can use the OpenSSL via syntax:
$ openssl rand -base64 30
-base64 option is used for encoding the output with length 30 characters.
Assign permissions to the password file:
chmod 600 /etc/rsyncd.secrets
This avoids the error "@ERROR: auth failed on module" for security.
Restart the rsyncd service:
/etc/init.d/rsyncd restart
Or reboot.
2. Set up Rsync Daemon on OMV (OpenMediaVault)
To enable the Rsync Daemon Server:
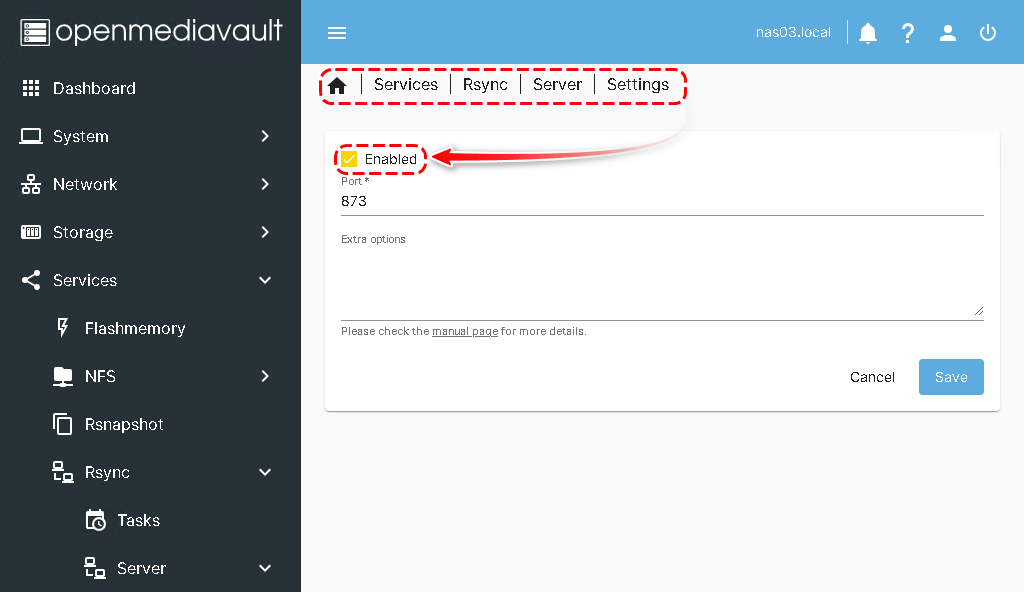
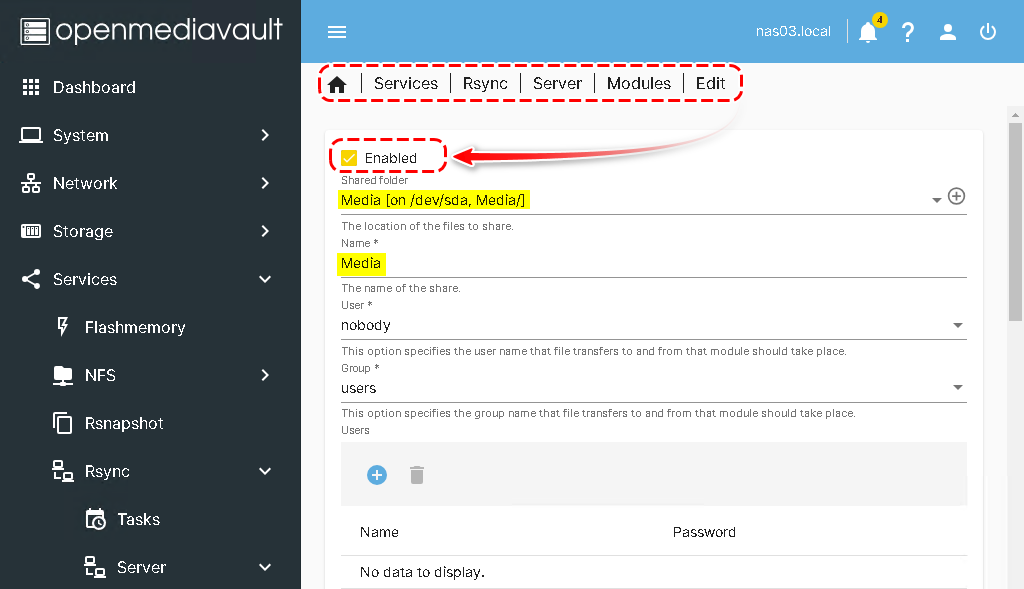
Add a share folder named “Media”
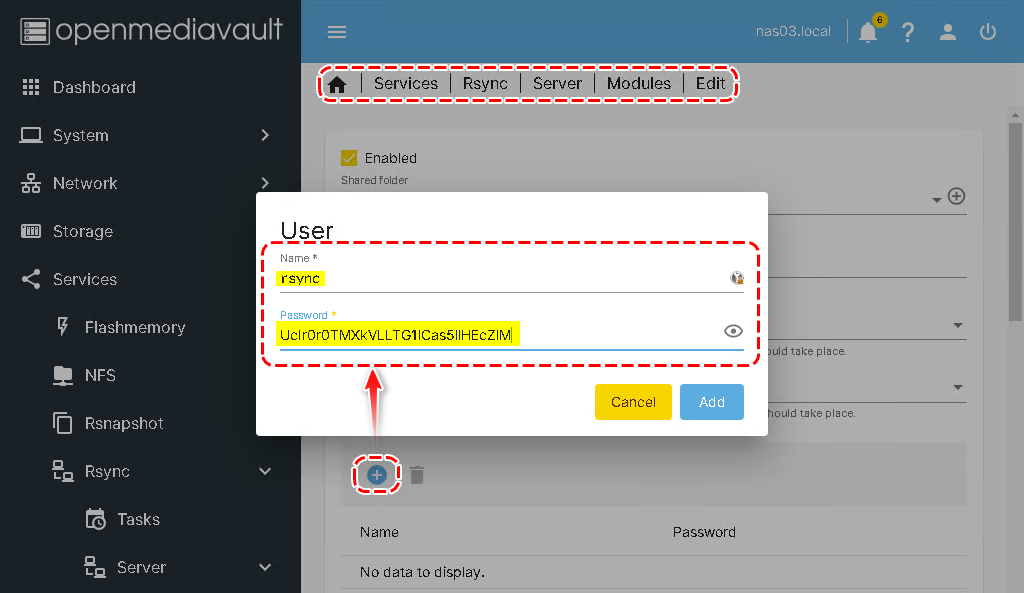
Create an account for authorization
3. Set up Rsync Daemon on DSM (Synology)
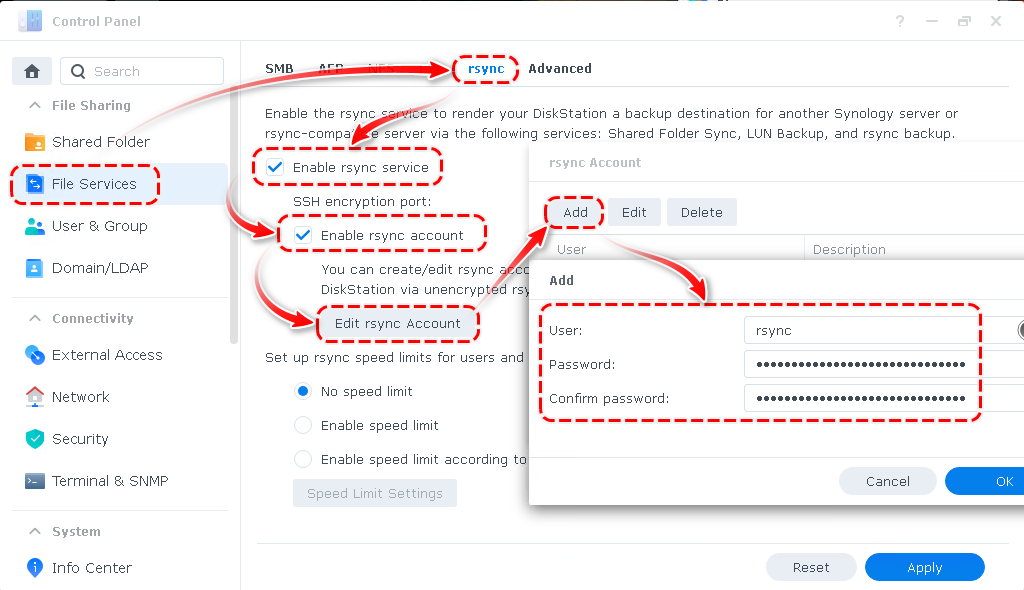
Enable rsync service
Go to Control Panel > File Services > rsync, and tick Enable rsync service.
Enabling rsync Accounts
- Go to Control Panel > File Services > rsync, and tick Enable rsync account.
- Click Edit rsync Account > Add to configure users
Assign user "rsync" to directory and privileges

Rsync Client Setup
Rsync is not only useful for local backups, but it can also be used to transfer data between different OS such as Windows, macOS, and Linux. You can use PUSH (backup to remote) or PULL (backup to local), but a server daemon is required.
1. Set up Rsync client on OpenWRT (Typical)
To install the rsync service:
opkg update && opkg install rsync
To backup using interactive mode:
rsync -avz /mnt/Tools/ [email protected]::Tools/
## You will be prompted to insert an authorization password for the user named user01
P@ssw0rd01
Alternatively, create a Rsync password file to store each user’s password to avoid having to insert the password each time:
echo "P@ssw0rd01" >> /etc/rsync.passwd
The file stored password is “P@ssw0rd01”.
You can create other password files as you have more than one user. For example, /etc/rsync.passwd2, and assign the file 600 permission:
chmod 600 /etc/rsync.passwd
To upload local data to a remote server, use the following syntax:
rsync -avz /mnt/Tools/ [email protected]::Tools/ --password-file=/etc/rsync.passwd
To download files from remote to local:
rsync -avz [email protected]::Media/ /mnt/Media/ --password-file=/etc/rsync.passwd
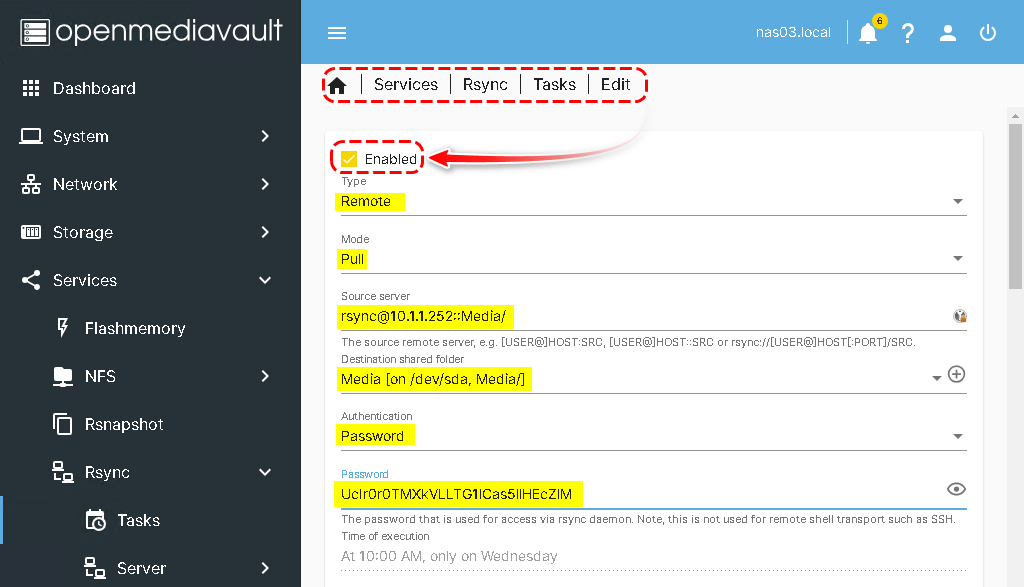
2. Set up Rsync client on OMV (OpenMediaVault)
In this screenshot, the remote folder’s data (Media) is being downloaded to the local harddisk.
3. Set up Rsync client on Windows
Install Rsync client software like a Linux through Chocolatey:
choco install rsync -y
Use the following syntax to transfer files:
rsync.exe -avhz --progress --update --chmod=ugo=rwX /cygdrive/c/tools /cygdrive/d/Other/
## "/cygdrive/c" indicates Driver "C:\" in Windows

Schedule a shell script to run using a CRON job on Linux
Create a shell script:
cat >> /root/rsync_bak.sh << EOF
#!/bin/bash

# Variables
OPTS="-avzP --delete"
LOG_DIR="/media/Tools/Tutorial/typecho/DNMP/logs"
BASE_DIR="/media/Tools/Tutorial/typecho/DNMP"
REMOTE_DIR="/Apps/DNMP"
HOST="REMOTE_SERVER_IP"
USER="opc"

# Log files
APPS_LOG="--log-file=${LOG_DIR}/Apps_$(date +'%Y-%m-%d-%H-%M-%S').txt"

# Rsync commands
rsync $OPTS $APPS_LOG -e ssh ${USER}@${HOST}:${REMOTE_DIR}/apps ${BASE_DIR}

# Delete log files older than 30 days
find ${LOG_DIR}/*.txt -mtime +30 -exec rm {} \;
EOF
Assign execute permission to the shell script:
chmod +x /root/rsync_bak.sh
Edit the crontab file to schedule the job:
crontab -e
Add the following syntax to the end of the file:
0 1 * * * sh /root/rsync_bak.sh 2>&1
## This will start the job at 1:00 a.m. every day.
3. Others
Create a copy of the directory structure from the 2023-2024/ directory in the 2024-2025 directory
rsync -a --include '*/' --exclude '*' 2023-2024/ 2024-2025
| Option | Description |
|---|---|
| -a | “archive” mode |
| –include ‘*/’ | includes all directories (*/) |
| –exclude ‘*’ | excludes all files (*) |
| 2023-2024/ | Existing Folder |
| 2024-2025 | New Folder |
Conclusion
Rsyncis a useful backup tool that provides fast incremental file transfer and supports various types of operating systems.Finally, I strongly recommend using the ‘
-e ssh’ option to transfer data with public key, as it provides better security through an encrypted tunnel.
Reference
- rsync (samba.org)
- Rsync | DSM - Synology Knowledge Center
- RSync — openmediavault 6.x.y documentation
- Linux 使用 rsync 遠端檔案同步與備份工具教學與範例
- rsyncd in openWRT | #Villa’s syslog (villasyslog.net)
